Important to use FBX6.1 ASCII and not any binary format. Otherwise cocos2d-x fbx-conv will produce horizontally compressed model when animating.
Friday, May 29, 2015
Thursday, May 28, 2015
Cocos2d-x: EXEC_BAD_ACCESS Frustum Dirty
If you get this error message:
EXEC_BAD_ACCESS Frustum Dirty
it means that the 3D model was wrongly added to
To solve it, you need to delay the adding of the 3D model until all the other code has executed.
So, do this:
EXEC_BAD_ACCESS Frustum Dirty
it means that the 3D model was wrongly added to
GameScene::init()
So, do this:
bool GameScene::init()
{
if ( !Layer::init() )
{
return false;
}
// Add all your 2D Sprites here
this->scheduleOnce(schedule_selector(GameScene::Init3DScene), 0.1f);
return true;
}
void GameScene::Init3DScene(float dt){
// Add all your 3D Sprite models here
auto girl = Sprite3D::create("girl.c3b");
this->addChild(girl);
}
Tuesday, May 26, 2015
Cocos2d-x: Extracting animation frames from 3D Model
If the 3D model already has animation frames attached to it. There are 2 ways to extract and use the embedded animation frames depending on what information you have.
If you know the individual frames and how it is spanned you can do this:
If you know the name of the animation, or if the frames are layered instead of in sequence, you can do this instead:
If you know the individual frames and how it is spanned you can do this:
auto shootAnim = Animation3D::create("Army.c3b");//Read all animation clips
auto shoot = Animate3D::createWithFrames(shootAnim, 40, 79);//Extract frames 40-79
shoot->setSpeed(2);
army->runAction(RepeatForever::create(shoot));
If you know the name of the animation, or if the frames are layered instead of in sequence, you can do this instead:
auto shootAnim = Animation3D::create("Army.c3b","Shoot");//Read only 'Shoot' frames
auto shoot = Animate3D::create(shootAnim);
shoot->setSpeed(2);
army->runAction(RepeatForever::create(shoot));
Cocos2d-x: Converting fbx to c3b
If you got a 3D model in fbx format with the textures placed in a separate folder, eg.
soldier.fbx
but the textures are in another subfolder:
Tex/body.png
Then, when doing the conversion using fbx-conv tool, put the subfolder containing the textures in the same folder containing the soldier.fbx, eg.
soldier.fbx
Tex/body.png
Then, do the conversion:
./fbx-conv soldier.fbx
Then copy the soldier.c3b file that is generated to your target Resource folder of your iOS project, and copy the contents of Tex to the target Resource folder of your iOS project. Do not create a Tex subfolder in the Resource folder of your iOS project. You should have something like this:
soldier.c3b
body.png
Then, after creating the 3D sprite in your game, if you get this error:
GL_CLAMP_TO_EDGE should be used in NPOT textures
it means you are not using power of 2 textures. NPOT means Not Power of Two. To solve, open your textures and resize to power of 2, e.g., 256 x 256, 512 x 512 etc.
soldier.fbx
but the textures are in another subfolder:
Tex/body.png
Then, when doing the conversion using fbx-conv tool, put the subfolder containing the textures in the same folder containing the soldier.fbx, eg.
soldier.fbx
Tex/body.png
Then, do the conversion:
./fbx-conv soldier.fbx
Then copy the soldier.c3b file that is generated to your target Resource folder of your iOS project, and copy the contents of Tex to the target Resource folder of your iOS project. Do not create a Tex subfolder in the Resource folder of your iOS project. You should have something like this:
soldier.c3b
body.png
Then, after creating the 3D sprite in your game, if you get this error:
GL_CLAMP_TO_EDGE should be used in NPOT textures
it means you are not using power of 2 textures. NPOT means Not Power of Two. To solve, open your textures and resize to power of 2, e.g., 256 x 256, 512 x 512 etc.
Monday, May 25, 2015
Cocos2d-x: 2D Sprites covering 3D Sprites
For certain Android devices e.g., Galaxy Tab 2, the 2D sprites will always be rendered on top of all 3D sprites and will cover 3D sprites. This gives the impression that the 3D sprites are never rendered. To solve this problem, set the Global Z Order of the 2D sprites to a high negative number, e.g. -1000. Then add your 3D sprite the usual way. For example, if you have a 2D background sprite and a 3D model of a gun, this how you could do it:
Size visibleSize = Director::getInstance()->getWinSize();
auto background = Sprite::create("Gfx/background.jpg");
background->setGlobalZOrder(-1000);
this->addChild(background);
auto gun = Sprite3D::create("Gfx/m16.c3b");
gun->setPosition3D(Vec3(x,y,z));
this->addChild(gun);
Friday, May 15, 2015
Cocos2d-x: Xcode Validation Error
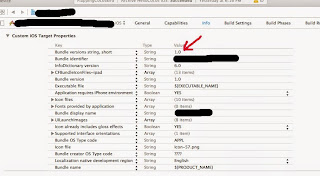
If you get this validation error:
then, fix it as follows:
then, fix it as follows:
That is, type in 1.0 in the Bundle versions string, short for your Info.plist. The Info.plist file is found in the iOS/Icons folder.
Then, delete the old archive, and re-archive and re-validate.
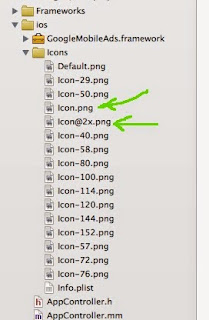
If you get this validation error:
Then, open any previous old projects to get dimensions of Icon.png and Icon@2x.png and create and put those icon in this folder:
Icon.png is 57 x 57 and Icon@2x.png is 114 x 114
Then, delete the old archive, then, re-archive and re-validate.
Thursday, May 14, 2015
Cocos2dx: Admob Android
After doing the steps for iOS Admob, continue with the steps below for Android.
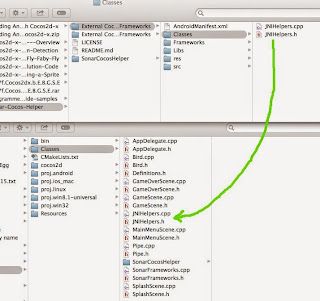
Copy the files JNIHelpers.cpp and JNIHelpers.h from folder External Cocos Helper Android Frameworks/Classes to your project's Classes folder:
That's it. Just run and it will work just like the iOS version.
Copy the files JNIHelpers.cpp and JNIHelpers.h from folder External Cocos Helper Android Frameworks/Classes to your project's Classes folder:
Copy the files SonarFrameworks.cpp and SonarFrameworks.h to the Classes folder of your cocos project:
Copy the file SonarFrameworkSettings.xml file from res/values to the res/values of your proj.android:
( Do not overwrite the res folder else you will lose the drawable folders and also the strings.xml )
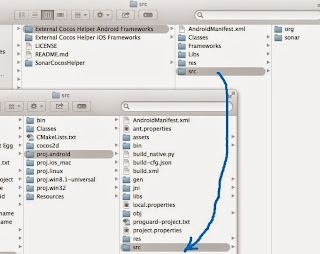
Then, copy the src folder and overwrite the src folder in proj.android:
And copy the AndroidManifest.xml and replace the same file in proj.android
Open the AndroidManifest.xml file in proj.android and make the following changes.
Change the package name to your packagename.
Edit the Android.mk file in proj.android jni folder:
to add the additional classes as follows:
LOCAL_SRC_FILES := hellocpp/main.cpp \
../../Classes/AppDelegate.cpp \
../../Classes/Bird.cpp \
../../Classes/GameOverScene.cpp \
../../Classes/GameScene.cpp \
../../Classes/MainMenuScene.cpp \
../../Classes/SplashScene.cpp \
../../Classes/Pipe.cpp \
../../Classes/JNIHelpers.cpp \
../../Classes/SonarFrameworks.cpp
The added files are:
../../Classes/JNIHelpers.cpp \
../../Classes/SonarFrameworks.cpp
Then build the proj.android by running build_native.py.
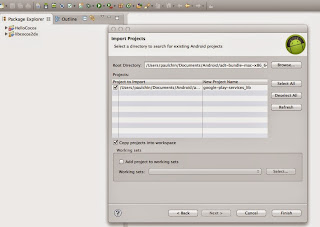
Open Eclipse and import libcocos2dx and your HelloCocos project. Then import google-play-services-lib:

Then, add it as a library:
Then add the google-play-services-lib.jar:
And also make sure to Order and Export it by checking the checkbox:
Then, open the AndroidManifest.xml file and make the following changes.
Enabled the following tags (by uncommenting them ), below is what it should look like:
<!-- Required for Google Play Services
<meta-data
android:name="com.google.android.gms.games.APP_ID"
android:value="@string/google_play_game_app_id" /> -->
<meta-data
android:name="com.google.android.gms.version"
android:value="@integer/google_play_services_version" />
<!-- End here requirement for Google Play Services -->
<!-- Required for AdMob -->
<activity android:name="com.google.android.gms.ads.AdActivity"
android:configChanges="keyboard|keyboardHidden|orientation|screenLayout|uiMode|screenSize|smallestScreenSize"
android:theme="@android:style/Theme.Translucent" />
<!-- End here requirement for AdMob -->
Enable only the following permissions and disable the rest:
<uses-permission android:name="android.permission.INTERNET" />
<uses-permission android:name="android.permission.ACCESS_NETWORK_STATE" />
Then open SonarFrameworkSettings.xml and enter the admob ids:
Copy the AdMob folder from Frameworks folder to folder proj.android/src/sonar/systems/frameworks
Click File, Refresh the Eclipse project to see the new Admob framework:
Open the file SonarFrameworkSettings.java and set Admob to true:
public static final boolean USE_ADMOB = true;
Cocos2dx: Admob iOS
This is based on the frameworks developed by Sonar Systems.
Download the SonarCocosHelper files from:
https://github.com/SonarSystems/Sonar-Cocos-Helper
You can follow the youtube instructions therein.
After downloading the zip file, unzip it and you get three main folders within Sonar-Cocos-Helper:
1. SonarCocosHelper
2. External Cocos Helper Android Frameworks
3. External Cocos Helper iOS Frameworks
Within the External Cocos Helper iOS Frameworks, unzip the GoogleMobileAdsSdkiOS-7.1.0.zip file to get the GoogleMobileAds.framework file.
Then, copy and paste it into the proj.ios_mac/ios folder:
Then, drag the GoogleMobileAds.framework from the above folder and drop it into the corresponding iOS folder in Xcode:
In above, be sure to select CreateGroups and nothing else. Having completed this step, it should look like this:
Then copy the SonarCocosHelper folder into the Classes folder of your cocos project:
Note that the SCH_AD_MOB_ENABLED is set to true. Make sure all the others are set to false. At time of writing MoPub is set to true by default - be sure to set it to false. Also, fill in the Admob banner and Fullscreen ad units. Fullscreen ad unit is also known as Interstitial ad in Admob terms. The location of the SCHSettings.h file is shown below:
Then, add these frameworks to Xcode:
// AdSupport.framework, AudioToolbox.framework, AVFoundation.framework, CoreGraphics.framework, CoreMedia.framework, CoreTelephony.framework, EventKit.framework, EventKitUI.framework, MessageUI.framework, StoreKit.framework, SystemConfiguration.framework
Alternatively, instead of adding the above frameworks one-by-one by hand, you can do it automatically by enabling modules:
Once you enable modules, Xcode will automatically add the necessary frameworks needed by Admob.
Then, to show ads, call the functions in the file SonarFrameworks.cpp. But before we can do that,
we need to init Admob before calling the show ads. This is best done in the GameScene. Don't put it in Splash or Menu scene because they are not always being accessed. GameScene is always accessed.
Open your GameScreen.cpp file and add:
And in the init method, do this:
Now, you can show ads in any scene you like, for example, I show ads in my GameOverScene.
When run, the iOS simulator will show Admob banner and interstitial Test ads.
Download the SonarCocosHelper files from:
https://github.com/SonarSystems/Sonar-Cocos-Helper
You can follow the youtube instructions therein.
After downloading the zip file, unzip it and you get three main folders within Sonar-Cocos-Helper:
2. External Cocos Helper Android Frameworks
3. External Cocos Helper iOS Frameworks
Within the External Cocos Helper iOS Frameworks, unzip the GoogleMobileAdsSdkiOS-7.1.0.zip file to get the GoogleMobileAds.framework file.
Then, copy and paste it into the proj.ios_mac/ios folder:
Then, drag the GoogleMobileAds.framework from the above folder and drop it into the corresponding iOS folder in Xcode:
In above, be sure to select CreateGroups and nothing else. Having completed this step, it should look like this:
Then copy the SonarCocosHelper folder into the Classes folder of your cocos project:
Then, drag and drop SonarCocosHelper folder from the Classes folder above to your Xcode Classes folder:
Note that you only select CreateGroups. No need to Copy files if needed because you already copied it into the Classes folder. Also no need to create folder references.
You should now get:
Note that the SonarCocosHelper folder is brown instead of blue, and, the SonarCocosHelper folder is within the Classes folder.
Then, open the SCHSettings.h and edit the admob fields as follows:
/*
Copyright (C) 2015 Sonar Systems - All Rights Reserved
You may use, distribute and modify this code under the
terms of the MIT license
Any external frameworks used have their own licenses and
should be followed as such.
*/
//
// SCHSettings.h
// Sonar Cocos Helper
//
// Created by Sonar Systems on 03/03/2015.
//
//
#ifndef __SCHSettings_h__
#define __SCHSettings_h__
#define SCH_IS_iADS_ENABLED false // iAd.framework
#define SCH_IS_AD_MOB_ENABLED true // AdSupport.framework, AudioToolbox.framework, AVFoundation.framework, CoreGraphics.framework, CoreMedia.framework, CoreTelephony.framework, EventKit.framework, EventKitUI.framework, MessageUI.framework, StoreKit.framework, SystemConfiguration.framework
#define SCH_IS_CHARTBOOST_ENABLED false // StoreKit.framework, Foundation.framework, CoreGraphics.framework, UIKit.framework
#define SCH_IS_REVMOB_ENABLED false // SystemConfiguration.framework, StoreKit.framework, MediaPlayer.framework, AdSupport.framework
#define SCH_IS_SOCIAL_ENABLED false // Social.framework
#define SCH_IS_GAME_CENTER_ENABLED false // Social.framework, GameKit.framework
//#define SCH_IS_EVERYPLAY_ENABLED false // AdSupport (iOS 6+, set to Optional link for pre-iOS 6 compatibility).framework, AssetsLibrary.framework, AudioToolbox.framework, AVFoundation.framework, CoreGraphics.framework, CoreImage (iOS 5+, set to Optional link for pre-iOS 5 compatibility).framework, CoreMedia.framework, CoreVideo.framework, Foundation.framework, MessageUI.framework, MobileCoreServices.framework, OpenGLES.framework, QuartzCore.framework, Security.framework, Social (iOS 6+, set to Optional link for pre-iOS 6 compatibility).framework, StoreKit.framework, SystemConfiguration.framework, Twitter (iOS 5+, set to Optional link for pre-iOS 5 compatibility).framework, UIKit.framework
#define SCH_IS_MOPUB_ENABLED false // AdSupport.framework,CoreGraphics.framework,CoreLocation.framework,CoreTelephony.framework,EventKit.framework,EventKitUI.framework,Foundation.framework,MediaPlayer.framework,QuartzCore.framework,StoreKit.framework†,SystemConfiguration.framework,UIKit.framework
#define SCH_MOPUB_BANNER_AD_UNIT @""
#define SCH_MOPUB_LAUNCH_INTERSTITIAL_AD_UNIT @""
#define SCH_MOPUB_ENDLEVEL_INTERSTITIAL_AD_UNIT @""
#define SCH_CHARTBOOST_APP_ID @""
#define SCH_CHARTBOOST_APP_SIGNATURE @""
#define SCH_REVMOB_MEDIA_ID @""
#define SCH_AD_MOB_BANNER_AD_UNIT_ID @"ca-app-pub-xxxxxxxxxxxxxxxx/xxxxxxxxxx"
#define SCH_AD_MOB_FULLSCREEN_AD_UNIT_ID @"ca-app-pub-xxxxxxxxxxxxxxxx/xxxxxxxxxx"
#define SCH_AD_MOB_TEST_DEVICE @""
//#define SCH_EVERYPLAY_CLIENT_ID @""
//#define SCH_EVERYPLAY_CLIENT_SECRET @""
#endif
Take note of these lines:
#define SCH_IS_AD_MOB_ENABLED true
#define SCH_AD_MOB_BANNER_AD_UNIT_ID @"ca-app-pub-xxxxxxxxxxxxxxxx/xxxxxxxxxx"
#define SCH_AD_MOB_FULLSCREEN_AD_UNIT_ID @"ca-app-pub-xxxxxxxxxxxxxxxx/xxxxxxxxxx"
Then, add these frameworks to Xcode:
// AdSupport.framework, AudioToolbox.framework, AVFoundation.framework, CoreGraphics.framework, CoreMedia.framework, CoreTelephony.framework, EventKit.framework, EventKitUI.framework, MessageUI.framework, StoreKit.framework, SystemConfiguration.framework
Alternatively, instead of adding the above frameworks one-by-one by hand, you can do it automatically by enabling modules:
Once you enable modules, Xcode will automatically add the necessary frameworks needed by Admob.
Then, to show ads, call the functions in the file SonarFrameworks.cpp. But before we can do that,
we need to init Admob before calling the show ads. This is best done in the GameScene. Don't put it in Splash or Menu scene because they are not always being accessed. GameScene is always accessed.
Open your GameScreen.cpp file and add:
#include "SonarFrameworks.h"
SonarCocosHelper::IOS::Setup();
Now, you can show ads in any scene you like, for example, I show ads in my GameOverScene.
In your GameOverScene.cpp, add the following include:
#include "SonarFrameworks.h"
Then, to show banner and interstitial, put this in the init method of GameOverScene.cpp:
//--- Admob ---
//SonarCocosHelper::AdMob::hideBannerAd();
//SonarCocosHelper::AdMob::showBannerAd();
//Default is top banner, if no param specified
SonarCocosHelper::AdMob::showBannerAd(SonarCocosHelper::AdBannerPosition::eBottom);
this->scheduleOnce(schedule_selector(GameOverScene::showAdmobInterstitial), 3);
Here is the implementation for showAdmobInterstitial:
void GameOverScene::showAdmobInterstitial(float dt){
SonarCocosHelper::AdMob::showFullscreenAd();
}
And the corresponding .h file:
class GameOverScene : public cocos2d::Layer
{
public:
static cocos2d::Scene* createScene(unsigned int tempScore);
virtual bool init();
CREATE_FUNC(GameOverScene);
private:
//--- Admob ---
void showAdmobInterstitial(float dt);
};
Saturday, May 9, 2015
Cocos2dx: Changing App Name and Bundle Display Name
App Name is the name of the project file. Bundle display name is the title found underneath the icon once it is installed on the device.
How to change app name (circled in red):
How to change bundle display name (circled in green):
How to change app name (circled in red):
How to change bundle display name (circled in green):
Cocos2dx: Difference between ampersand and asterisk
Ampersand & is a reference. It cannot be modified.
eg:
bool onContactBegin(cocos2d::PhysicsContact &contact);
Asterisk * is a pointer. It can be modified.
eg:
bool onTouchBegan(cocos2d::Touch *touch, cocos2d::Event *event);
Cocos2dx: Difference between schedule and scheduleUpdate
This is the generic schedule:
This is scheduleUpdate:
ScheduleUpdate requires lowercase update.
//In GameScene.cpp
this->schedule(schedule_selector(GameScene::Update));
void GameScene::Update(float dt){
}
//In GameScene.h
class GameScene : public cocos2d::Layer
{
public:
static cocos2d::Scene* createScene();
virtual bool init();
CREATE_FUNC(GameScene);
private:
void Update(float dt);
};
//In GameScene.cpp
this->scheduleUpdate();
void GameScene::update(float dt){
}
//In GameScene.h
class GameScene : public cocos2d::Layer
{
public:
static cocos2d::Scene* createScene();
virtual bool init();
CREATE_FUNC(GameScene);
private:
void update(float dt);
};
Thursday, May 7, 2015
Cocos2dx: Accelerometer
In .h:
class HelloWorld : public cocos2d::Layer
{
public:
static cocos2d::Scene* createScene();
virtual bool init();
CREATE_FUNC(HelloWorld);
void OnAcceleration(cocos2d::Acceleration *acc, cocos2d::Event *event);
};
Implementation:
bool HelloWorld::init()
{
if ( !Layer::init() )
{
return false;
}
Device::setAccelerometerEnabled(true);
auto listener = EventListenerAcceleration::create(
CC_CALLBACK_2(HelloWorld::OnAcceleration, this));
Director::getInstance()->getEventDispatcher()
->addEventListenerWithSceneGraphPriority(listener, this);
return true;
}
void HelloWorld::OnAcceleration(cocos2d::Acceleration *acc, cocos2d::Event *event){
CCLOG("%f",acc->z);
}
Cocos2dx: Sprite Ease Animations
Examples:
auto action = MoveBy::create(2, Vec2(100,0));
mySprite->runAction(EaseElasticInOut::create(action,0.5));
or
mySprite->runAction(EaseBounceIn::create(action));
Cocos2dx: Scene Transitions
Examples:
Director::getInstance()->replaceScene(TransitionFlipX::create(2, scene));
Director::getInstance()->replaceScene(TransitionFade::create(2, scene));
Cocos2dx: Replacing a Scene
In HelloWorld.h:
class HelloWorld : public cocos2d::Layer
{
public:
static cocos2d::Scene* createScene();
virtual bool init();
CREATE_FUNC(HelloWorld);
void Play(Ref *pSender);
};
In HelloWorld.cpp:
#include "NewScene.h"
bool HelloWorld::init()
{
if ( !Layer::init() )
{
return false;
}
auto menu_item_1 = MenuItemFont::create("Play", CC_CALLBACK_1(HelloWorld::Play, this));
auto *menu = Menu::create(menu_item_1,NULL);
menu->alignItemsVerticallyWithPadding(40);
this->addChild(menu);
return true;
}
void HelloWorld::Play(cocos2d::Ref *pSender){
CCLOG("Play");
auto scene = NewScene::createScene();
Director::getInstance()->replaceScene(scene);
}
In NewScene.h:
class NewScene : public cocos2d::Layer
{
public:
static cocos2d::Scene* createScene();
virtual bool init();
CREATE_FUNC(NewScene);
void GoBack(Ref *pSender);
};
In NewScene.cpp:
#include "HelloWorldScene.h"
bool NewScene::init()
{
if ( !Layer::init() )
{
return false;
}
auto menu_item_1 = MenuItemFont::create("Go Back", CC_CALLBACK_1(NewScene::GoBack, this));
auto *menu = Menu::create(menu_item_1,NULL);
menu->alignItemsVerticallyWithPadding(40);
this->addChild(menu);
return true;
}
void NewScene::GoBack(cocos2d::Ref *pSender){
auto scene = HelloWorld::createScene();
Director::getInstance()->replaceScene(scene);
}
Subscribe to:
Comments (Atom)


